To reduce blender noise in a small kitchen, place it on a firm counter, use a thick nonslip mat, blend in short bursts, secure loose parts, and choose quieter times when possible.
In many American homes, the kitchen also serves as a breakfast nook, work area, or shared living space. In a small apartment, condo, or rental home, the sound of a blender can travel through the room and disturb family members, roommates, or neighbors. A loud morning smoothie can feel even louder when hard walls, tile floors, and bare countertops reflect the sound.
You do not always need to buy a new blender to make blending less disruptive. Start with the surface beneath the appliance, the way you load the jar, and the condition of the blade assembly and lid. These simple checks can reduce some vibration and rattling, although they cannot remove the motor noise that comes with high-speed blending.
The best approach is to lower the noise you can control without blocking ventilation, weakening the appliance’s stability, or changing how its safety features work. The steps below explain what causes blender noise, which changes are worth trying first, and when a persistent new sound means you should stop and inspect the machine.
A blender makes sound in several ways. Its motor produces mechanical and airflow noise, while the blades move food and liquid at high speed. The jar, lid, and base can also vibrate, especially when the contents are thick or the appliance sits on an unstable surface.
A small kitchen can make these sounds seem stronger. Hard surfaces such as tile, stone, glass, and bare walls reflect sound instead of absorbing much of it. If the blender sits beside a wall or beneath an empty cabinet, some of that sound may reflect back toward the person using it.
It helps to separate normal operating noise from a problem. A steady motor whir that becomes louder at higher speeds can be normal. A new metallic rattle, harsh grinding sound, strong shaking, or burning odor deserves attention because it may point to a loose part, an obstruction, wear, or a motor problem.
The goal is not to make every blender silent. It is to reduce avoidable vibration, limit sound reflections, and use the appliance in a way that suits the space.
Source: co.pinterest.com
Motor noise
The motor produces sound as it spins. A mat or a change in counter position may have little effect on this part of the noise.
Vibration and rattling
A loose lid, unstable jar, uneven counter, or worn component can add unwanted sounds to normal motor noise.
Sound reflection
Bare walls, hard counters, and nearby cabinets can reflect sound around a compact room.
Food movement
Hard ingredients, thick mixtures, or a poorly loaded jar can change the sound and strain the motor.
How Can You Tell Normal Noise From a Fault?
Listen for changes from the blender’s usual sound. If the motor has always been loud at its highest setting but runs smoothly, the noise may be normal for that model. If it suddenly rattles, squeals, grinds, or shakes much more than before, stop the blender and unplug it before checking removable parts.
Never reach into a blender jar while the appliance is plugged in. Do not test exposed blades by hand, open the motor housing, or attempt an electrical repair unless you have the proper qualifications and the manufacturer permits the work.
Steady whir
Often linked to normal motor operation, especially at higher speeds.
Loose or tapping rattle
Check the lid, jar fit, accessories, and nearby objects after unplugging the appliance.
Grinding or burning smell
Stop using the blender and consult the manual or an authorized service provider.
1. Move the Blender to a Stable Counter
Start by placing the blender on a flat, sturdy countertop. A stable surface can limit rocking and reduce the extra rattling that occurs when the base moves during blending.
Clear the area around the blender before turning it on. Keep utensils, jars, dishes, and other loose items away from the base because they may vibrate against one another and add clatter. Make sure the appliance sits flat on its feet rather than on a seam, raised edge, or uneven board.
In a small kitchen, counter space may be limited. Even so, avoid balancing a blender on a narrow shelf, a lightweight folding table, or a cart that moves when the motor starts. A solid counter near an open section of the room is often a better choice than a cramped corner surrounded by loose objects.
Source: blenderjunkie.com
Check the surface
Press gently on the empty blender base while it is unplugged. It should not rock or sit unevenly.
Move loose items
Keep cups, utensils, and containers from touching the blender or each other during use.
Leave room around the base
Do not wedge the blender between objects that could shift or block its ventilation openings.
Should You Put the Blender Near a Wall?
A wall can reflect sound back into the kitchen, so moving the blender away from a nearby wall may change how loud it seems to you. However, moving it into a tight gap beneath cabinets can make access harder and may interfere with airflow.
Try an open section of the counter if one is available. Follow the clearance requirements in your manual, especially around the motor base and any air vents. Never trade ventilation or stability for a small possible reduction in reflected sound.
Best practical setup
Use an open, level work area with enough space to handle the jar safely.
Avoid enclosed gaps
Do not run the blender inside a cupboard or other confined space unless its manufacturer specifically approves that setup.
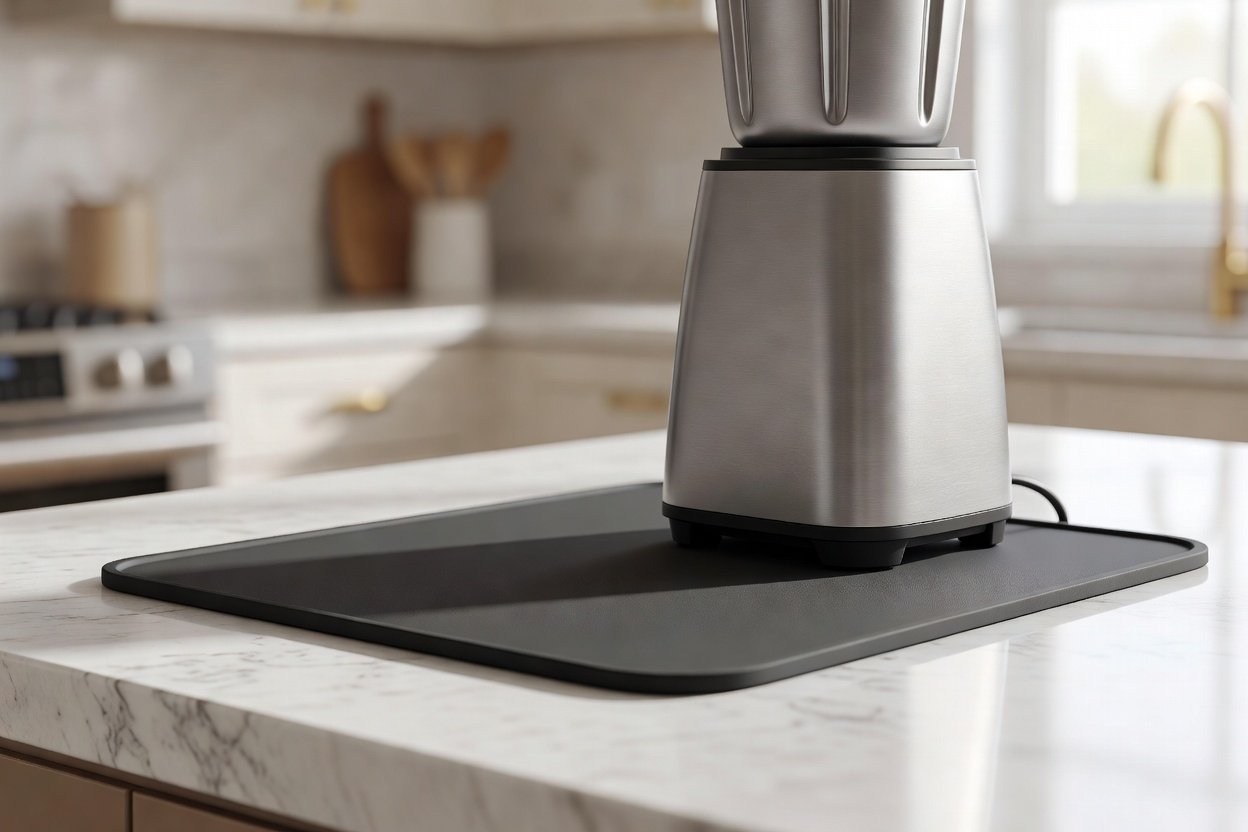
2. Use a Firm, Nonslip Mat to Limit Vibration
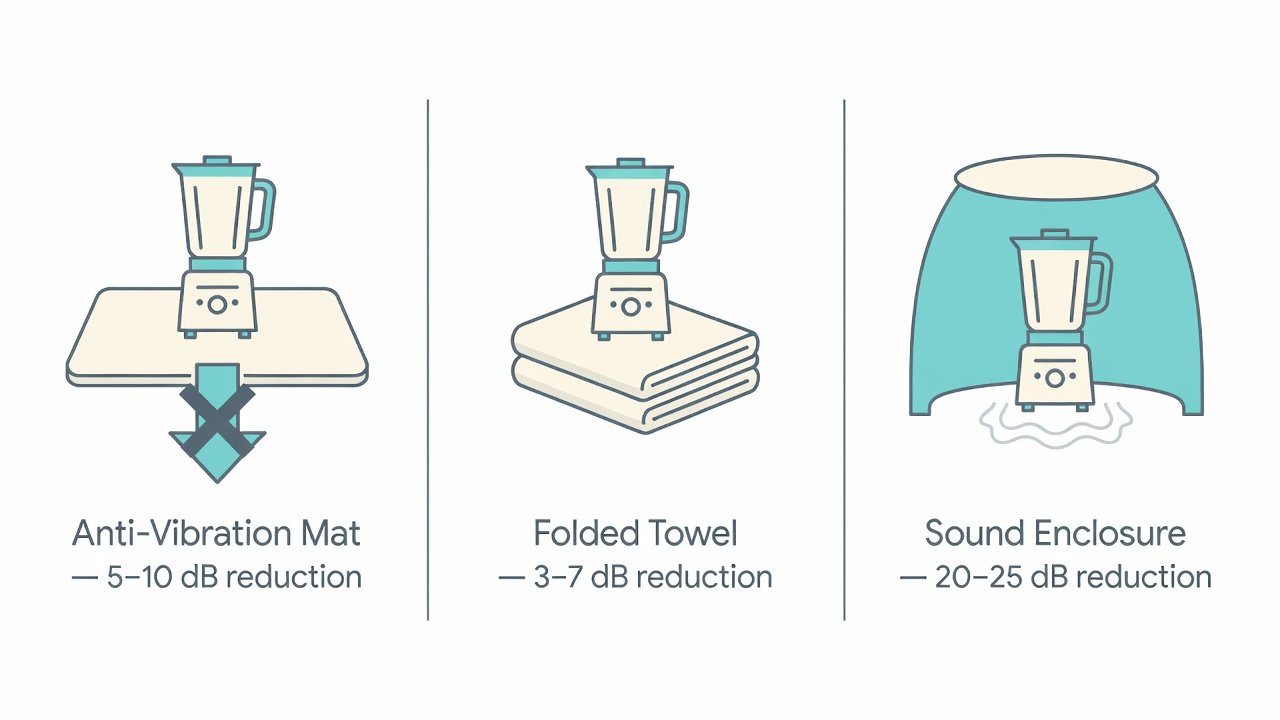
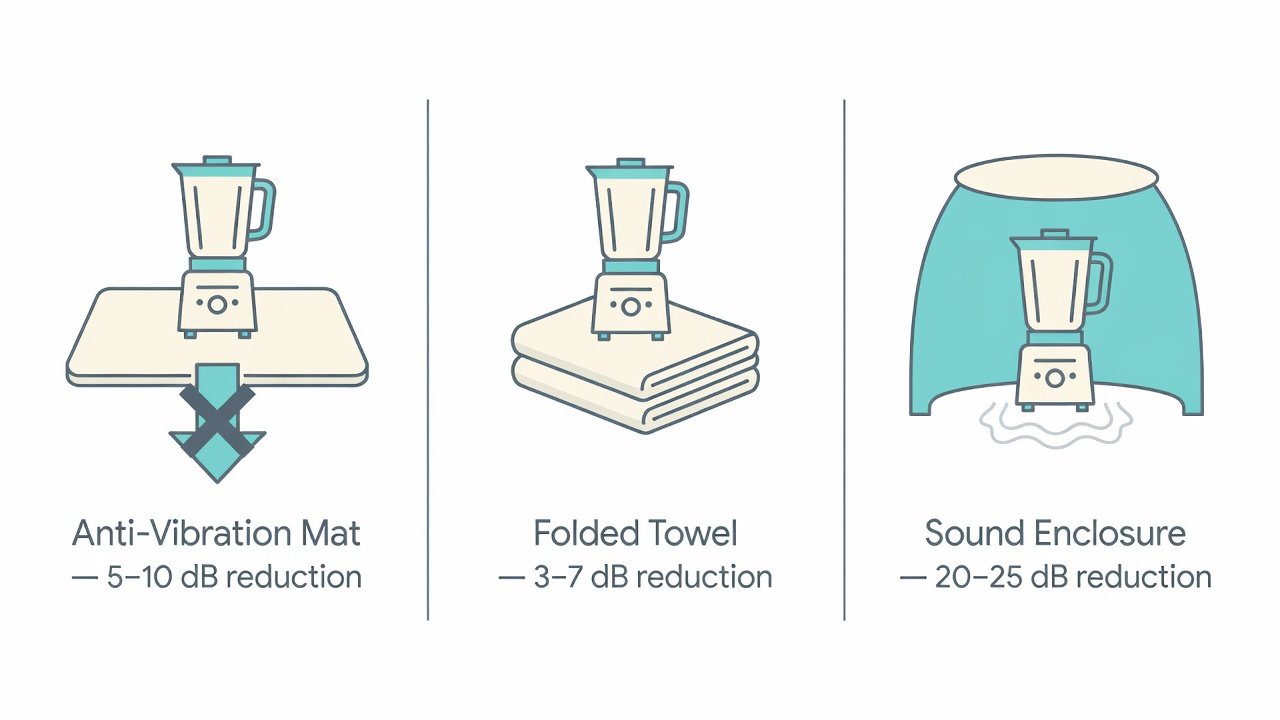
A suitable mat can help reduce vibration that travels from the blender base into the countertop. This can be useful in a compact kitchen where the counter acts like a sounding board and adds a low hum or buzz to the room.
Choose a thin, stable, nonslip mat made for appliance use or a firm rubber pad that fits the blender’s footprint. The blender must remain level, and its feet must rest securely on the surface. Check the manual first if the manufacturer specifies that the base must sit directly on the counter.
Softness alone does not make a mat effective. A thick cushion may compress unevenly, let the blender wobble, or make the appliance less stable at high speed. Avoid loose fabric, folded towels, and spongy materials that can bunch up beneath the base.
After placing a suitable mat, test the blender with a small, normal batch while keeping your hands away from moving parts. If the base shifts, rocks, or slides, stop the machine and remove the mat.
Source: blenderjunkie.com
Look for a secure fit
The pad should sit flat and should not extend so far that it catches on nearby objects.
Keep the controls accessible
The mat must not cover switches, buttons, cords, or ventilation openings.
Check for moisture
Keep the counter and mat dry so the base does not slip during use.
Will a Silicone Baking Mat Work?
A thin silicone mat may provide some grip, but not every baking mat is designed to support a vibrating appliance. Its thickness, texture, heat rating, and ability to stay flat all affect whether it is suitable.
Use one only if it stays firmly in place and the blender manufacturer permits this type of surface. A purpose-made appliance pad is easier to assess because it is intended to support equipment rather than cookware.
Good sign
The blender remains level, does not slide, and runs without added rocking.
Bad sign
The pad curls, shifts, compresses unevenly, or causes the base to wobble.
3. Check the Jar, Lid, and Removable Parts
Loose parts can add rattles that sound worse than the motor itself. Before blending, make sure the jar is seated correctly, the lid fits as intended, and any removable accessories are attached according to the instructions.
Unplug the blender before inspecting it. Look for cracks, damaged tabs, worn seals, loose handles, and food trapped around the jar base or blade assembly. Clean removable parts as directed in the manual and let them dry before reassembly.
Do not tighten a blade assembly beyond the manufacturer’s instructions or try to repair a cracked jar with glue. A damaged container or poorly secured blade unit can leak or fail during use. Replace damaged parts with compatible components approved for the exact model.
Also check for nearby items that may seem unrelated to the blender. A loose cabinet door, utensil holder, or glass on the counter may rattle in time with the motor. Move those objects before deciding that the blender itself is faulty.
Source: blenderjunkie.com
Inspect the lid
Confirm that it fits securely and that its removable center cap is correctly installed when required.
Inspect the jar
Look for cracks, chips, damaged locking points, or movement where the jar meets the base.
Check the blade assembly
Follow the manual to identify wear or damage without touching sharp edges.
Replace damaged parts
Do not keep using a jar, seal, or accessory that no longer fits or locks securely.
Why Does My Blender Rattle Even When It Is Empty?
First, do not run an empty blender simply to investigate a noise. Some models require liquid or food in the jar, and operating without a proper load can be unsuitable for the motor or blade assembly.
With the appliance unplugged, check the jar seating, lid, accessories, base feet, and nearby objects. If a new rattle persists during normal use after these checks, stop using the blender and contact the manufacturer or a qualified repair service.
Check external parts first
Look for loose accessories and poor seating before assuming the motor has failed.
Do not open the motor housing
Internal repairs can expose electrical parts and should be left to a qualified technician when needed.
4. Change How You Load and Blend Ingredients
The way you fill the jar can affect how hard the blender works and how much noise it makes. A very thick mixture, a packed jar, or ingredients that cannot move freely may cause the motor to labor or the contents to churn unevenly.
Follow the recipe and your blender’s minimum and maximum fill guidance. Add liquid when the recipe allows it, cut large ingredients into suitable pieces, and avoid packing the jar beyond its marked limit. For smoothies, adding liquid before frozen fruit or other solid ingredients may help the blades draw the mixture down, but follow the model’s instructions.
Start at a low speed if the manual and recipe permit it, then increase the speed as needed. Some blenders use a preset program that controls speed automatically. In that case, use the intended setting instead of forcing the machine into an unfamiliar operating pattern.
Avoid repeatedly stopping and restarting the blender to fight a jam. Turn it off, unplug it, and follow the manual’s instructions for clearing an obstruction. Never use a spoon or spatula inside a moving jar.
Source: quiethome.life
Avoid overfilling
Leave the headroom required by the jar markings and recipe, especially for liquids that can foam.
Prepare large ingredients
Cut ingredients to the size recommended for your model rather than forcing large pieces into the blades.
Use suitable liquid
For recipes that allow it, enough liquid can help ingredients circulate and reduce prolonged motor strain.
Respect the duty cycle
Follow the manual’s limits on continuous operation and rest periods to avoid overheating.
Do Short Blending Bursts Make a Blender Quieter?
Short bursts can limit the time your kitchen is exposed to blender noise, particularly when a recipe needs only a few quick pulses. They do not necessarily make the motor quieter while it is running, and repeated starts can also be noisy.
Use the pulse setting for tasks that suit it, such as briefly breaking up ingredients. For a smooth mixture, follow the recipe and let the blender run for the time needed without exceeding its operating limits. Do not stop early if the food is not blended safely or properly.
Useful for brief tasks
Pulsing can work well for chopping or breaking up ingredients when the recipe permits.
Not a cure for all noise
The motor and blades still make sound during every pulse.
5. Reduce Sound Reflections Around the Blender
Soft furnishings and suitable sound-absorbing materials can reduce some reflections in a room. In a small kitchen, a nearby fabric-covered chair or an absorbent surface elsewhere in the room may help the space sound less harsh, though it will not stop the motor from producing noise.
Focus on changes that do not create a fire, heat, moisture, or hygiene risk. Keep cloth, paper, curtains, and other loose materials away from the motor, blades, hot cookware, and cooking flames. Do not hang towels around the blender or drape anything over it while it runs.
If the kitchen opens into a living room, sound may travel through the shared space. Closing an interior door between rooms, where practical and safe, may limit how much noise reaches other areas. A door will not fully block sound, especially through gaps or shared walls.
You can also move the blender away from large bare surfaces when the counter layout permits. Avoid placing it inside a cupboard or pressing it against a wall to create a makeshift sound barrier. Airflow and safe access matter more than a small change in perceived loudness.
Source: longroadhomeproject.com
Use room furnishings wisely
Soft furnishings away from heat and splashes may reduce some room reflections.
Keep the work area clear
Do not place towels, paper, curtains, or loose padding next to the motor or moving parts.
Limit sound travel
Close a suitable room door when practical, and consider the needs of people in adjoining rooms.
Can Cabinets Make a Blender Sound Louder?
Cabinets and walls can reflect sound, so a blender may seem louder when it sits in a tight corner. The effect depends on the room, the appliance, and the surfaces nearby.
Try moving the blender to another safe counter position rather than enclosing it. Do not run the machine in a closed cabinet unless the manufacturer specifically designed and approved that use.
Try a different position
Choose an open area with a firm counter and enough room to operate the blender safely.
Keep airflow open
Never block ventilation openings with cabinet panels, foam, fabric, or other materials.
6. Consider a Blender Sound Enclosure Carefully
A purpose-built sound enclosure can reduce some airborne noise by placing sound-absorbing material around the blender. It may be useful in a very small apartment kitchen, especially when the blender is used often and the manufacturer supports that setup.
Not every enclosure is suitable for every blender. Some designs can trap heat, block the motor’s air intake or exhaust, hide the controls, or make it harder to respond if the jar shifts. A box that looks quiet on the outside is not automatically safe for a running appliance.
Before buying or building an enclosure, check the blender manual and any enclosure instructions for model compatibility and required clearances. Do not rely on an improvised wooden box lined with foam unless its design has been assessed for the appliance’s ventilation, heat, electrical access, and operating needs.
A sound enclosure also takes up counter space. Measure the available area and consider whether the enclosure can be moved, cleaned, and stored without creating clutter. For occasional blending, better placement and good maintenance may be more practical.
Source: blenderjunkie.com
Check compatibility
Use an enclosure only when it is suitable for the appliance and its required ventilation.
The enclosure should not trap food residue, moisture, or dust around the appliance.
Avoid untested DIY boxes
Do not assume that foam, wood, or other sound-absorbing material is safe near a running motor.
Is a DIY Blender Sound Box Worth It?
A DIY box may appear affordable, but its value depends on whether it safely reduces enough noise to justify the space and effort. Without a verified design, it is difficult to know how much sound it will block or whether it will allow enough cooling air to reach the motor.
For renters and people with limited counter space, a stable mat, careful ingredient preparation, and a better blending schedule are easier to reverse and maintain. Consider an enclosure only after those basic steps and only if the design suits your exact appliance.
Potential benefit
A suitable enclosure may reduce some airborne sound reaching the room.
Main limitation
It cannot eliminate motor vibration, and an unsuitable design may cause overheating or obstruct access.
7. Blend at a Time That Works for Your Household
When you share a small home, timing can be as useful as sound control. If you prepare a smoothie before work, try blending after other household members wake up or before quiet hours begin, as long as that fits your schedule.
For apartment residents, consider the building’s quiet-hour rules and how sound travels through shared walls and floors. A blender’s brief operating time may still be disruptive late at night or early in the morning, especially in a compact space with hard surfaces.
You can save time by measuring ingredients, washing fruit, and setting out the jar before blending. This does not reduce the motor’s sound level, but it can reduce the total time the appliance runs and help you avoid repeated cycles caused by forgotten ingredients.
If you need to prepare several servings, consider whether blending one properly sized batch is more efficient than running many small batches. Do not exceed the blender’s capacity or fill limits to save time. The correct batch size is the one the manufacturer and recipe allow.
Source: blenderjunkie.com
Prepare first
Measure ingredients and assemble the recipe before switching on the blender.
Respect quiet hours
Choose a time that is less likely to disturb roommates, family, or nearby residents.
Plan batch size
Blend a suitable amount without exceeding the jar’s capacity or the motor’s operating limits.
What If You Must Blend Early in the Morning?
Prepare ingredients the night before and keep them refrigerated when needed for food safety. In the morning, place the blender on its prepared, stable surface and use the shortest blending process that produces the intended result.
If the recipe can be made in advance without compromising food safety or quality, prepare it earlier and store it in a suitable sealed container in the refrigerator. Do not leave perishable smoothies at room temperature for long periods simply to avoid using the blender during quiet hours.
Prepare ahead
Wash and portion ingredients in advance, storing them at the correct temperature.
Use a suitable recipe
Choose a recipe that blends efficiently without requiring excessive run time.
8. Maintain the Blender to Prevent Extra Noise
Regular care can help prevent avoidable rattles and changes in sound. Food residue, worn seals, damaged jar fittings, and loose accessories may affect how the appliance fits together or operates.
Unplug the blender before cleaning or inspecting its parts. Wash the jar, lid, and other removable components according to the manual, and keep the motor base dry. Do not immerse the motor base in water unless the manufacturer explicitly permits it.
Inspect the power cord and plug for visible damage. If you see exposed wires, melted areas, scorch marks, or other damage, stop using the appliance and arrange proper service or replacement. Never try to quiet a damaged appliance by adding padding around its base or covering its housing.
Follow the manufacturer’s guidance for cleaning beneath removable components and checking seals. Do not apply oil or lubricant to the blade assembly, motor shaft, or bearings unless the manufacturer specifically instructs you to do so. Incorrect lubrication can damage parts or contaminate food.
Source: blenderjunkie.com
Clean after use
Remove food residue from parts the manual identifies as washable and dry them before storage.
Inspect seals and fittings
Replace worn or damaged components with compatible parts approved for your model.
Protect the motor base
Keep water away from electrical components and do not block cooling vents.
Follow service guidance
Use authorized service for internal problems, especially when the motor or electrical system may be involved.
When Should You Stop Using a Noisy Blender?
Stop the blender immediately if you notice smoke, a burning electrical smell, sparks, a damaged cord, or severe new vibration. Switch it off, unplug it if you can do so safely, and let the appliance cool before handling it.
Do not restart a machine that has shown signs of electrical damage or serious mechanical failure just to see whether the sound goes away. Consult the manual, the manufacturer, or a qualified repair professional. If the appliance is under warranty, check the approved service process before attempting repairs.
Stop immediately
Smoke, sparks, a burning odor, exposed wiring, or severe shaking are warning signs.
Avoid internal repairs
Do not dismantle the motor or bypass interlocks to investigate a noise.
Seek suitable service
Use the manufacturer’s support route or a qualified repair provider when a fault persists.
9. Compare Your Options Before Spending Money
You can often start reducing blender noise without buying a new appliance. The best first step depends on whether the main issue is vibration, rattling, room reflections, long blending time, or the blender’s normal motor sound.
Use the comparison below to choose a practical next step. The expected effect is qualitative rather than a measured decibel reduction because results vary by blender model, counter construction, room layout, ingredients, and operating speed.
Try one change at a time and listen from the same spot in the kitchen. If you move the blender, change the mat, alter the ingredients, and add an enclosure all at once, you will have a harder time identifying which change helped.
Source: blenderjunkie.com
Start with free changes
A stable surface, correctly fitted parts, sensible fill levels, and good timing cost little or nothing.
Buy only what solves the problem
Consider an appliance pad or compatible sound enclosure only after identifying the main source of noise.
Keep a safe setup
Reject any solution that causes rocking, blocks ventilation, hides controls, or makes the blender harder to clean.
Which Noise-Reduction Method Should You Try First?
If the blender shakes or rattles, start with the counter, feet, jar seating, lid, and accessories. If the motor sounds steady but the whole kitchen seems loud, try a more open counter position and adjust the time you blend. If the motor suddenly sounds different, treat it as a possible fault rather than a soundproofing problem.
For vibration
Use a stable counter and, if permitted, a firm nonslip appliance pad.
For loose rattles
Inspect removable parts and nearby objects while the blender is unplugged.
For room noise
Reduce unnecessary sound reflections and keep the appliance away from tight enclosed spaces.
For excessive motor noise
Check for a new fault and consider professional service or a quieter replacement if normal operation remains too disruptive.
10. What to Look for If You Need a Quieter Blender
If you have tried the basic changes and the blender is still too loud for your home, consider whether a different model would better suit your needs. Not all blenders make the same amount or type of sound, and a model with a sound enclosure may be more suitable for some shared spaces than a conventional open-base design.
Look for documented noise information from the manufacturer when it is available. A decibel figure is useful only when the measurement method and conditions are clear, because distance from the blender, room acoustics, speed, and ingredients can affect the reading. Do not compare figures taken under different conditions as if they were directly equivalent.
Check the blender’s jar capacity, intended tasks, cleaning needs, size, warranty, and service options as well as noise. A compact model may fit a small counter but may not handle your usual recipes. A sound enclosure may reduce some noise but take up more storage and counter space.
If you can inspect a unit in person, ask whether it can be operated under safe conditions and whether the sound information reflects real use. Customer reports can help identify recurring concerns, but individual impressions are not controlled measurements. Choose a model based on verified features and your actual kitchen constraints rather than a broad claim that it is silent.
Source: quiethome.life
Check documented noise data
Look for measurement conditions, not just a claim that a blender is quiet.
Match the appliance to your recipes
Confirm that the model can handle the ingredients and serving sizes you use.
Assess available space
Measure the base, jar, lid clearance, and any enclosure before buying.
Review care and service
Check cleaning requirements, replacement parts, warranty terms, and available support.
Can a Blender Be Completely Silent?
A conventional powered blender cannot be completely silent while its motor and blades are running. Noise reduction means limiting some combination of motor sound, vibration, rattling, and sound reflection.
If near-silent food preparation is essential, consider whether a different preparation method can do the job. A manual masher or hand tool may suit soft foods, while a manual shaker may work for some drinks. These alternatives cannot replace a blender for every task, especially when you need to break down hard or frozen ingredients.
Choose the right tool
Use a manual alternative only when it can safely and effectively prepare the food.
Set realistic expectations
A quieter setup can reduce disruption but will not remove every sound from powered blending.
A Simple Troubleshooting Plan for a Loud Blender
Use this order when the blender is louder than you would like. It begins with easy, low-risk checks and leaves possible mechanical or electrical faults for the appropriate service route.
First, switch off and unplug the blender. Inspect the counter, base feet, jar, lid, and removable parts. Check the power cord visually, and stop if you find damage, smoke, a burning smell, or signs of serious failure.
Next, correct the setup. Place the blender on a level surface, remove loose items nearby, and use a compatible nonslip pad only if the manual allows it. Prepare the ingredients according to the recipe and the manufacturer’s capacity and operating guidance.
Finally, test the blender only if no warning signs remain. Use a normal, suitable batch and the intended setting, then listen from the same position as before. If the sound remains unusually harsh, the base moves, or the motor labors, stop and seek support rather than adding more padding or forcing the machine to run.
Step 1: Stop and inspect
Unplug the appliance and check for visible damage, loose parts, and objects that could rattle.
Step 2: Improve the setup
Use a stable counter, clear the area, and confirm that the base and jar fit correctly.
Step 3: Prepare the ingredients
Use an appropriate batch size, suitable liquid when the recipe allows it, and the correct setting.
Step 4: Reassess safely
Run a normal blending task only if there are no warning signs, and stop if unusual noise or movement persists.
How Can You Tell Whether a Change Worked?
A useful change should make the blender more stable, reduce an avoidable rattle, shorten unnecessary blending time, or make the sound less disruptive in the room. You do not need a sound meter to notice these practical changes, but do not treat a subjective impression as a measured decibel reduction.
Compare one adjustment at a time under similar conditions. Keep the recipe, fill level, speed, and listening position as consistent as practical. If the blender’s sound changes suddenly or becomes harsher, prioritize checking for a fault instead of continuing the comparison.
Signs of improvement
Less base movement, fewer rattles, stable operation, and no new warning signs.
Signs to stop
Persistent grinding, smoke, burning odor, damaged wiring, severe vibration, or unusual motor strain.
Next-Question Gap Map
The following editorial map separates practical questions inferred from the main task from questions that would need direct search or support-record evidence. It is not a report of verified search demand or a live comparison of competing pages.
The priority reflects the potential value to a reader trying to make a blender less disruptive in a compact home. Safety, stability, and basic troubleshooting come before optional purchases or advanced soundproofing.
Question: Will a mat make every blender quieter?
Stage: Before acting. Basis: Inferred next need from the proposed vibration-control step. Competitor coverage: Not checked here. Benefit: Sets realistic expectations. Evidence needed: Exact model guidance and controlled measurements on comparable surfaces. Priority: High. Placement: Mat section.
Question: Can I build a soundproof box for my blender?
Stage: Choosing a solution. Basis: Inferred next need from interest in enclosure methods. Competitor coverage: Not checked here. Benefit: Prevents unsafe enclosure designs. Evidence needed: Manufacturer ventilation requirements and a validated enclosure design. Priority: High. Placement: Enclosure section.
Question: Why did my blender suddenly get louder?
Stage: Troubleshooting. Basis: Inferred next need from a change in sound. Competitor coverage: Not checked here. Benefit: Helps readers separate normal operating sound from possible faults. Evidence needed: Exact model manual and service guidance. Priority: High. Placement: Fault diagnosis and maintenance sections.
Question: Which blender is quiet enough for an apartment?
Stage: Considering replacement. Basis: Inferred next need from shared-wall and quiet-hour concerns. Competitor coverage: Not checked here. Benefit: Supports a more informed purchase decision. Evidence needed: Comparable noise measurements, verified model features, and current manuals. Priority: Medium. Placement: Quieter blender section.
Question: How can I blend breakfast without waking others?
Stage: Planning use. Basis: Inferred next need from common early-morning routines in shared homes. Competitor coverage: Not checked here. Benefit: Offers timing and preparation options. Evidence needed: Recipe requirements and relevant food-storage guidance. Priority: Medium. Placement: Timing section.
Research Scope and Evidence Limits
This guide uses general appliance-care and sound-control principles to explain practical options. No blender was physically tested for this article, and no controlled sound measurements were taken. The expected effect of each change is therefore described qualitatively rather than as a guaranteed reduction.
The supplied image list includes pages and images related to blender noise, but the presence of an image URL alone does not verify a technical claim. Model-specific operating limits, ventilation clearances, maintenance steps, and replacement-part compatibility should be confirmed in the exact manufacturer’s manual.
A full competitor audit would require opening and reviewing three to five relevant articles and checking live related questions, current manuals, and suitable primary guidance. That audit has not been established in this article, so no claim is made that a particular question is absent from the wider web or that any question has a verified search volume.
Documented general principles
Stable support, secure parts, correct loading, ventilation, and safe maintenance are practical appliance-use considerations.
Not tested by us
No decibel readings, hands-on blender tests, product comparisons, or enclosure performance measurements are claimed.
Model-specific checks
The exact user manual remains the authority for operating limits, permitted surfaces, cleaning, and service requirements.
Frequently Asked Questions
Q
What Is the Easiest Way to Reduce Blender Noise?
Start by placing the blender on a flat, sturdy counter and clearing loose items from the area. Check that the jar and lid fit correctly, and use a suitable nonslip pad only if the manufacturer permits it. These steps can reduce extra vibration and rattling without changing the blender itself.
Q
Does Putting a Towel Under a Blender Reduce Noise?
A towel may seem to soften vibration, but it can fold, compress, or let the blender move. That makes it a poor default choice for a high-speed appliance. Use a stable surface and a suitable appliance pad instead, provided the manual allows it.
Q
Can I Cover My Blender While It Is Running?
No. Do not cover a running blender with a towel, blanket, or other loose material. The covering may block ventilation, interfere with the controls, or contact moving parts. If you need more sound control, consider a compatible purpose-built enclosure that preserves airflow and safe access.
Q
Why Is My Blender Louder When I Make a Smoothie?
Frozen fruit, hard ingredients, thick mixtures, and an overloaded jar can change the sound and make the motor work harder. Follow the recipe and the blender’s fill limits, prepare large ingredients as directed, and add liquid when appropriate. If the motor labors or the sound becomes unusually harsh, stop and check the manual before continuing.
Q
Will a Blender Sound Enclosure Work in a Small Apartment?
A suitable enclosure may reduce some airborne noise, but the result depends on the enclosure design, blender model, and room. It cannot remove all motor or vibration noise. Check compatibility, ventilation, access to the controls, cleaning needs, and available counter space before using one.
Q
Should I Replace My Blender If It Is Too Loud?
Consider replacement if normal operating noise remains disruptive after you have checked the setup, removable parts, ingredients, and maintenance. Compare documented noise information when available, but confirm how measurements were taken. If the blender suddenly develops grinding, burning smells, smoke, or severe vibration, stop using it and seek service rather than treating the problem as ordinary noise.
Q
Can I Use a Blender in a Closed Kitchen Cabinet to Muffle the Sound?
Do not run a blender inside a closed cabinet unless the manufacturer specifically approves that arrangement. An enclosed space may block cooling air, make controls harder to reach, and trap heat. Move the blender to an open, stable counter instead.
✦ Wrapping Up
Conclusion
Reducing blender noise in a small kitchen starts with a few simple checks. Place the appliance on a stable counter, inspect the jar and lid, clear nearby objects, and use a suitable nonslip mat if the manual permits it. Then prepare ingredients correctly and avoid running the blender longer than the recipe requires.
If the room still sounds loud, try a more open counter position and choose a time that works for your household. A compatible sound enclosure may help in some kitchens, but never block ventilation or cover the appliance with loose materials. If the noise is new, harsh, or paired with a burning smell, smoke, damaged wiring, or severe vibration, stop using the blender and seek suitable service.
The best solution is the one that reduces avoidable noise while keeping the blender stable, clean, cool, and safe to use. Start with the no-cost changes, assess each one under similar conditions, and spend money only when you know which problem you need to solve.
💡 Key Takeaway
Before your next smoothie, unplug the blender and check its feet, jar, lid, and nearby objects. Set it on a level counter, prepare the ingredients according to the manual, and test one safe change at a time.