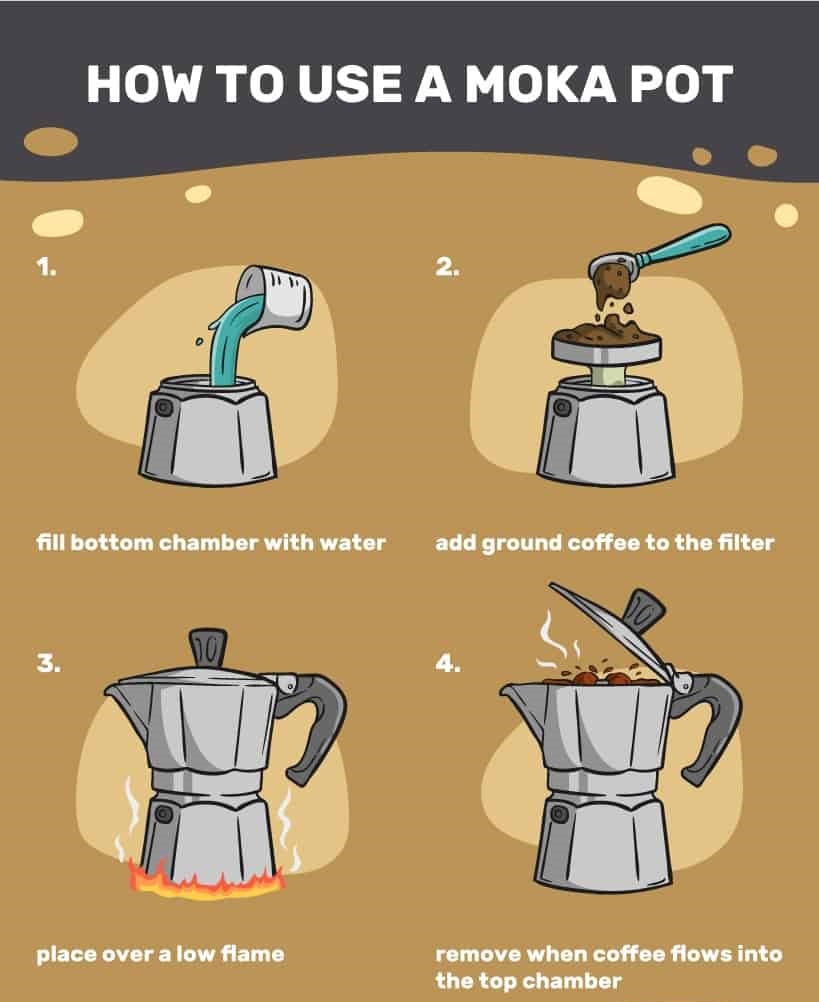
To make coffee in a Moka pot, fill the bottom chamber with water below the safety valve, add medium-fine coffee to the basket without pressing it, assemble the pot, and heat it gently until coffee flows into the top chamber.
Coffee is part of many daily routines across the United States. Whether you make a quick cup before driving to work, enjoy a slow weekend breakfast, or need something strong during an afternoon break, a Moka pot offers a simple way to brew rich coffee at home. It works on a stovetop and does not need electricity beyond the heat source.
Learning how to make coffee in a Moka pot is easier than it may seem. The brewer has three main parts: a bottom chamber for water, a filter basket for ground coffee, and an upper chamber that collects the finished drink. Heat creates pressure that pushes hot water through the coffee and into the top section. The result is a strong, concentrated drink with a bold taste.
The secret to a good cup is not expensive equipment. You need the right amount of water, a suitable grind, an even coffee bed, and steady heat. This guide explains each step, shows how to avoid common mistakes, and helps you adjust the taste to match your preference.
A Moka pot is a stovetop coffee maker that uses heat and steam pressure to move water through ground coffee. It is often called a stovetop espresso maker because it produces a strong drink with a rich body. However, it does not make true espresso because its brewing pressure is much lower than that of a standard espresso machine.
Most traditional Moka pots have three main sections. Each part has a specific job, and all three must fit together correctly for the brewer to work as intended.
When you place the assembled pot on a burner, the water in the lower chamber heats up. The pressure pushes hot water through the coffee basket and into the upper chamber. Once the brewing cycle is complete, you can pour the coffee into a cup.
Bottom chamber
This section holds the water. It also contains the safety valve, which helps release excess pressure when needed.
Filter basket
This metal basket holds the ground coffee. Water passes through the grounds before moving into the upper chamber.
Upper chamber
This section collects the brewed coffee. It usually has a pouring spout, lid, and handle.
Is Moka Pot Coffee the Same as Espresso?
No. Moka pot coffee is strong and concentrated, but it is not technically espresso. An espresso machine uses a pump to force hot water through finely ground coffee at much higher pressure.
A Moka pot uses steam pressure instead. Its coffee often has a heavier taste than regular drip coffee, but it does not produce the same texture or crema as a traditional espresso machine. You can still use it as a base for milk drinks, iced coffee, and other espresso-style recipes.
Moka pot
Produces concentrated, bold coffee with a rich body.
Espresso machine
Produces true espresso through high-pressure extraction.
Drip coffee maker
Produces a larger amount of less concentrated coffee through gravity.
What You Need Before Making Coffee in a Moka Pot
Gather your equipment and ingredients before you start. Having everything ready makes the process easier and helps you avoid leaving the pot on the stove longer than needed.
You do not need a large coffee station. A Moka pot, fresh ground coffee, clean water, and a suitable heat source are enough for a basic brew. A grinder and kitchen scale can help you get more consistent results.
Source: i.pinimg.com
Moka pot
Choose a pot with a size that matches the number of servings you normally prepare. Check that the handle, filter, gasket, and safety valve are in good condition.
Fresh coffee
Whole beans are useful because you can grind them just before brewing. Medium and medium-dark roasts are practical starting choices.
Clean water
Use fresh drinking water. Filtered water can help if your tap water has a strong taste or high mineral content.
Coffee grinder
A burr grinder gives you better control over grind size. Pre-ground coffee can also work if it is not too fine.
Stovetop or compatible heat source
Check the manufacturer’s instructions before using your pot. Some aluminum Moka pots do not work directly on induction cooktops.
Heat-resistant cloth or mitt
Use one when handling the hot pot, especially if you started with hot water in the lower chamber.
Which Coffee Beans Should You Choose?
Medium and medium-dark roasted beans are good starting points for Moka pot brewing. They often produce a balanced cup with chocolate, nut, caramel, and toasted flavors. These flavors also work well when you add milk.
Light roasts can produce brighter and fruitier coffee, but they may need some adjustment to grind size and brewing technique. Dark roasts can taste bold, although excessive heat may make their smoky or bitter notes more noticeable.
Freshness matters more than choosing a famous brand. Buy beans that suit your taste, store them in an airtight container away from heat and sunlight, and grind only what you need.
Light roast
A good option if you prefer brighter flavors and gentle acidity.
Medium roast
A balanced choice for everyday Moka pot coffee.
Medium-dark roast
Useful for a fuller taste that works well with milk.
Dark roast
Suitable for people who enjoy strong, roasted flavors, but requires careful heat control.
What Is the Best Coffee Grind Size for a Moka Pot?
A medium-fine grind is a good starting point. The coffee should feel finer than the grounds used for a typical drip coffee maker but slightly coarser than a fine espresso grind.
If the coffee is too coarse, water may pass through too quickly and produce a weak cup. If it is too fine, water may struggle to move through the coffee bed. Very fine grounds can also clog the filter and create pressure problems.
Think of the texture as fine table salt or caster sugar. The exact appearance can vary with the grinder and coffee beans, so make small changes when adjusting your recipe.
Too coarse
May create weak, thin coffee. Try grinding slightly finer.
Too fine
May slow the flow and increase the risk of clogging. Try a slightly coarser grind.
Medium-fine
A practical starting point for a balanced Moka pot brew.
How to Make Coffee in a Moka Pot Step by Step
The basic brewing process takes only a few steps. The most important things are keeping the water below the safety valve, filling the coffee basket without tamping, and controlling the heat.
The following method works as a starting point for a traditional stovetop Moka pot. Your exact brewing time will depend on the pot size, burner, water temperature, and coffee grind.
Source: i.pinimg.com
Step 1: Check the Moka pot
Make sure the pot is cool and fully disassembled. Check the filter plate, funnel, rubber gasket, and safety valve. Remove old grounds and make sure the parts are clean.
Step 2: Add water to the lower chamber
Pour fresh water into the bottom chamber. Stop just below the safety valve. Never cover or block the valve, and do not fill the chamber beyond the manufacturer’s recommended level.
Step 3: Fill the coffee basket
Place the funnel basket into the lower chamber. Add medium-fine coffee until the basket is full and level. Do not press, pack, or tamp the grounds.
Step 4: Clean the basket rim
Remove loose coffee grounds from the basket edge and the sealing surface. Grounds trapped between the parts can prevent a proper seal.
Step 5: Assemble the pot
Screw the upper chamber onto the lower chamber. Hold the base with a dry cloth if you used hot water. Tighten the sections firmly without forcing or damaging the threads.
Step 6: Place the pot on the stove
Set the Moka pot on low to medium heat. Use a burner that fits the base. If using a gas stove, keep the flame beneath the pot rather than letting it reach the sides or handle.
Step 7: Watch the coffee flow
Keep an eye on the upper chamber. Coffee should begin flowing through the central spout after the water heats. A steady, controlled stream is a good sign.
Step 8: Remove the pot from the heat
Take the pot off the burner when the coffee stream becomes pale or starts to sputter. Do not wait for the pot to boil loudly or run dry.
Step 9: Stop the brewing process
Place the pot on a heat-resistant surface. If needed, carefully cool the lower chamber with a cool, damp cloth or a brief rinse of the base, following the manufacturer’s instructions.
Step 10: Stir and serve
Carefully stir the coffee in the upper chamber to distribute its strength. Pour it into small cups and serve while hot.
Should You Use Hot or Cold Water?
Both methods can work, but starting with hot water can reduce the time the coffee grounds spend over the burner. This may help limit the cooked or bitter flavors that can develop during a long heating cycle.
Hot water also makes the lower chamber hot before assembly. Use a thick, dry kitchen towel or heat-resistant mitt when tightening the pot. Never hold a hot metal base with bare hands.
Cold or room-temperature water is simpler to handle and is suitable for following many standard manufacturer instructions. If you choose this method, use moderate heat and remove the pot as soon as the brew reaches its finishing stage.
Hot water
Can shorten the heating stage and reduce the time coffee is exposed to burner heat.
Cold or room-temperature water
Is easier to handle during setup but may require a longer heating period.
How Long Does a Moka Pot Take to Brew?
A typical Moka pot may take around 3 to 6 minutes to brew, although the actual time depends on its size, the starting water temperature, and the heat source. A larger pot or a lower burner setting may take longer.
Do not use the clock as your only guide. Watch the coffee as it enters the upper chamber and listen for changes in sound. A gentle flow is better than a fast, forceful stream.
When the flow turns light and the pot begins to gurgle, remove it from the heat. This helps prevent the remaining water and steam from pushing harsh-tasting coffee through the basket.
Slow, steady flow
Usually indicates that the heat is under control.
Fast, forceful flow
May indicate excessive heat. Lower the burner setting.
Pale coffee and sputtering
Signal that the brew is reaching its end. Remove the pot from the heat.
How Much Coffee and Water Should You Use?
The size of your Moka pot determines how much coffee and water you should use. Unlike a drip coffee maker, a traditional Moka pot is designed around a specific basket capacity and lower-chamber water level.
For consistent results, fill the coffee basket to its normal level and add water to just below the safety valve. Do not force a different amount into the pot to reach an exact coffee-to-water ratio.
A rough coffee-to-water ratio of 1:8 to 1:10 can serve as a general reference, but the basket and safety valve are more useful guides for a traditional brewer. The amount of finished coffee will also be lower than the starting water volume because some water remains in the lower chamber.
Source: i.pinimg.com
Small Moka pot
Use the basket and water capacity specified for the small model. Avoid trying to make a half batch in a full-size basket unless the manufacturer permits it.
Medium Moka pot
Fill the basket evenly and use the correct water level for its chamber.
Large Moka pot
Use the full basket capacity and enough water to reach the correct level below the valve.
Can You Make Half a Pot of Coffee?
A traditional Moka pot works best when you follow its intended basket and water capacity. Filling only half the basket can change how water moves through the coffee and may produce uneven results.
If you regularly want a smaller serving, consider using a smaller Moka pot. This gives you a better match between the amount of coffee you brew and the amount you plan to drink.
Best approach
Use a smaller pot designed for the amount you normally drink.
Important exception
Some models have approved reducers or special instructions for smaller batches. Follow the instructions for that exact model.
Why Is There Water Left in the Bottom Chamber?
Finding a small amount of water in the lower chamber after brewing is normal. A Moka pot is not designed to push every last drop through the coffee basket.
The remaining water helps keep the brewing system from running completely dry. Do not continue heating the pot just to remove every drop, because this can create excessive sputtering and harsh flavors.
Normal result
A little water remains in the lower chamber after brewing.
Potential problem
If almost no coffee reaches the upper chamber, check the grind, filter, basket, and gasket.
How to Get a Smooth and Rich Moka Pot Brew
A smooth cup comes from controlling extraction rather than using more coffee or higher heat. Small adjustments to the grind, water, and burner can make a noticeable difference.
Start with one basic recipe and change only one variable at a time. This makes it easier to understand which adjustment improves the flavor.
Source: techabettor.com
Use freshly ground beans
Grinding just before brewing helps preserve the coffee’s aroma. Store unused beans in a sealed container away from heat, moisture, and direct sunlight.
Choose a suitable grind
Use medium-fine grounds rather than very fine espresso powder or coarse French press grounds.
Keep the coffee bed level
Spread the grounds evenly across the basket. Do not tamp or compress them.
Control the heat
Use low to medium heat and avoid a rapid, aggressive brewing cycle.
Stop at the right time
Remove the pot when the stream becomes pale or starts sputtering instead of allowing it to boil on the stove.
Stir before pouring
Mix the coffee in the upper chamber to help distribute the stronger and lighter portions.
How to Make Moka Pot Coffee Less Bitter
Bitter coffee often means the brew has been exposed to too much heat or has continued too long. A very fine grind, packed coffee basket, or aggressive burner setting can also contribute to an unpleasant taste.
Start by lowering the heat. Remove the pot as soon as the coffee begins to turn pale and sputter. If the taste remains harsh, adjust the grind slightly coarser on your next attempt.
Do not change the grind, water level, and heat all at once. A single adjustment helps you identify the real cause.
Reduce the heat
A slower and gentler brewing cycle can help prevent harsh flavors.
Grind slightly coarser
Try this if the coffee tastes harsh and the basket is not clogged.
Remove the pot earlier
Do not allow the coffee to continue boiling or sputtering on the burner.
How to Make Stronger Coffee
A Moka pot naturally produces concentrated coffee. If you want a stronger-tasting cup, start with fresh beans and make sure the basket is filled to its intended capacity.
You can also choose a medium-dark roast if you enjoy a deeper, more roasted flavor. Avoid adding extra coffee beyond the basket’s capacity or packing the grounds tightly.
Remember that strength and bitterness are not the same thing. A strong cup should still have a balanced taste rather than a burnt or unpleasant finish.
Use a fuller-bodied roast
Medium-dark beans can provide a bold taste.
Fill the basket correctly
Use the intended basket capacity without adding pressure.
Keep heat controlled
Higher heat does not automatically produce better or stronger coffee.
Common Moka Pot Problems and How to Fix Them
Most brewing problems come from four areas: grind size, water level, heat, and the condition of the pot’s seal. Checking these parts in order is usually more useful than changing the whole recipe.
Always let the pot cool before taking it apart or inspecting its filter. If the safety valve releases steam unexpectedly, remove the pot from the heat if you can do so safely and allow it to cool completely before investigating.
Source: i.pinimg.com
Problem: Coffee does not come out
Check whether the grind is too fine, the basket is packed, or the filter is clogged. Also inspect the gasket and make sure the pot is assembled correctly.
Problem: Coffee tastes burnt
The burner may be too hot, or the pot may have stayed on the stove too long. Reduce the heat and remove the pot earlier.
Problem: Coffee tastes weak
The grind may be too coarse, the basket may be underfilled, or the coffee may be stale. Check the normal basket fill and try a slightly finer grind.
Problem: Coffee leaks around the middle
Coffee grounds may be trapped on the sealing surface, or the gasket may be damaged. Clean the rim and inspect the gasket after the pot cools.
Problem: Coffee sputters too early
Excessive heat, very fine grounds, or a packed basket may be restricting the flow. Reduce the heat and check the coffee preparation.
Problem: Coffee tastes metallic
Check whether the pot is new, damaged, or poorly cleaned. Follow the manufacturer’s first-use instructions and inspect the metal for signs of corrosion.
What If Steam Escapes From the Safety Valve?
Steam escaping from the safety valve can indicate that pressure is not moving through the coffee basket as intended. A clogged filter, very fine grounds, packed coffee, or a blocked valve may be involved.
Do not try to tighten, remove, or repair a hot or pressurized pot. Turn off the heat if safe, keep your hands and face away from the valve, and let the pot cool fully before checking it.
Clean the parts according to the manufacturer’s instructions. Never block the valve or continue using a pot with a damaged pressure-release system.
Inspect the coffee basket
Look for packed grounds or blocked holes after the pot has cooled.
Check the safety valve
Make sure it is clean and unobstructed. Do not attempt to modify it.
Replace damaged parts
Use suitable replacement parts recommended for your Moka pot.
What If the Moka Pot Leaks?
A leak around the connection between the upper and lower chambers often points to a sealing problem. Coffee grounds on the rim can prevent the gasket from making full contact.
After the pot cools, remove the gasket and filter plate if the manufacturer allows it. Clean the contact surfaces and check for cracks, hardening, or other damage.
If the gasket no longer seals properly, replace it with a compatible part. Do not try to solve a leaking problem by applying excessive force when tightening the pot.
Clean the rim
Remove loose coffee grounds from the sealing surfaces.
Inspect the gasket
Look for cracks, deformation, and signs of wear.
Check the threads
Make sure the upper and lower sections fit together correctly.
How to Clean and Maintain a Moka Pot
Clean your Moka pot after every use. Coffee oils and old grounds can build up inside the basket and upper chamber, which may affect the taste of future brews.
Wait until the pot is completely cool before taking it apart. Never open a hot or pressurized Moka pot, and handle the metal sections carefully because they may retain heat.
Traditional aluminum Moka pots often require hand washing and should not be placed in a dishwasher. Check your specific model’s care instructions because stainless steel and other designs may have different cleaning requirements.
Source: coffeegrindguru.com
Step 1: Let the pot cool
Wait until the metal parts are safe to handle before disassembling the brewer.
Step 2: Remove used coffee grounds
Take out the funnel basket and empty the used coffee into a compost bin or trash can.
Step 3: Rinse the components
Wash the lower chamber, basket, and upper chamber with warm water, following the care instructions for your model.
Step 4: Clean the filter
Check the filter plate and funnel holes for trapped grounds. Use a soft brush when needed.
Step 5: Check the gasket
Inspect the rubber or silicone ring for cracks, stiffness, or damage.
Step 6: Dry all parts
Allow the components to dry fully before storing the pot. This helps prevent moisture buildup.
Should You Use Soap to Clean a Moka Pot?
Cleaning instructions depend on the material and manufacturer. Some traditional aluminum pots are intended to be rinsed with warm water rather than washed with strong detergents.
Other models may allow mild dish soap. Follow the instructions for your exact brewer instead of assuming every Moka pot has the same care requirements.
Avoid harsh scrubbers and abrasive cleaners that can damage the surface. A soft cloth or brush is usually enough for routine cleaning.
Aluminum models
Follow the manufacturer’s washing instructions, which commonly recommend hand rinsing and thorough drying.
Stainless steel models
Check whether mild dish soap is permitted and whether the parts are dishwasher safe.
All models
Keep the filter and safety valve clean and never store the pot while its parts are wet.
When Should You Replace the Moka Pot Gasket?
The gasket is an important part of the brewer because it helps create a seal between the upper and lower chambers. Over time, heat and regular use can cause the material to harden, crack, or lose its shape.
There is no single replacement schedule that works for every pot. Inspect the gasket regularly and replace it when it becomes damaged or no longer seals correctly.
Choose a replacement that matches the exact model and size of your Moka pot. A poorly fitting gasket can cause leaks and prevent proper brewing.
Visible cracks
Replace a gasket that has splits or breaks.
Hard or deformed material
Replace a ring that has lost its normal flexibility or shape.
Repeated leaking
Inspect the gasket and sealing surfaces instead of continuing to brew with a poor seal.
How to Serve Moka Pot Coffee
Moka pot coffee is flexible. You can drink it straight from a small cup, add hot water for a longer drink, or mix it with milk for a smooth coffee beverage.
Because the brew is concentrated, you may find that a small serving is enough. If you prefer a larger cup, dilute it with hot water instead of filling the basket with extra coffee or changing the water level beyond the safety valve.
Source: essencecoffee.ie
Drink it black
Pour the coffee into a small cup and enjoy its natural roasted flavor.
Make an Americano-style drink
Add hot water to the brewed coffee until it reaches your preferred strength.
Add warm milk
Combine the coffee with warm milk for a smooth, latte-style drink.
Make an iced coffee
Pour the coffee over ice in a suitable glass. Add cold milk or water if desired.
Add a little sweetener
Use sugar, honey, or another preferred sweetener to balance the coffee’s stronger flavor.
Can You Make a Latte With a Moka Pot?
Yes. A Moka pot can provide the strong coffee base for a homemade latte-style drink. Brew the coffee as usual and add steamed or heated milk to your cup.
You do not need a traditional espresso machine to make a simple milk coffee at home. A separate milk frother can help create foam, but warmed milk also works.
Adjust the amount of milk to your taste. Use less milk for a stronger drink or more milk for a softer, creamier flavor.
Brew the coffee
Make a normal Moka pot batch and pour the finished coffee into a cup.
Heat the milk
Warm your preferred milk without allowing it to boil over.
Combine and serve
Add the milk to the coffee and stir. Add foam if you prefer.
Can You Make Iced Coffee With a Moka Pot?
Yes. Moka pot coffee works well as a base for iced coffee because its concentrated flavor can stand up to ice and milk.
Brew the coffee, let it cool briefly, and pour it over a glass filled with ice. Add cold water or milk to adjust the strength.
For a less diluted drink, chill the coffee before serving or use coffee ice cubes. Avoid pouring very hot coffee into a glass that is not designed to handle heat.
For a stronger iced drink
Use less added water or milk.
For a smoother iced drink
Add cold milk and stir well.
For less dilution
Use chilled coffee or coffee ice cubes.
Frequently Asked Questions
Q
How much coffee should I put in a Moka pot?
Fill the filter basket to its normal capacity and level the grounds without pressing them down. The correct amount depends on the size and design of your Moka pot. Avoid adding extra coffee beyond the basket’s intended capacity.
Q
Do you tamp coffee in a Moka pot?
No. Do not tamp or tightly pack the coffee grounds in a traditional Moka pot. Simply fill the basket evenly and level the surface. Packing the grounds can restrict water flow and interfere with normal pressure release.
Q
Should the Moka pot lid be open or closed while brewing?
Many coffee brewing guides recommend leaving the lid open so you can watch the coffee flow and identify when it starts sputtering. Keep your face and hands away from the hot opening. You can close the lid when removing the pot from the burner.
Q
Why does my Moka pot coffee taste weak?
Weak coffee may result from grounds that are too coarse, an underfilled basket, stale beans, or an incorrect brewing setup. Check that the basket is filled to its intended level and try a slightly finer grind. Also make sure the pot is not leaking.
Q
Can I use regular ground coffee in a Moka pot?
Yes, but the grind size matters. Regular pre-ground coffee may work if it has a medium-fine texture. Very coarse drip coffee grounds can produce a weak cup, while very fine espresso powder may restrict water flow.
Q
Can I use a Moka pot on an induction stove?
It depends on the material and design. Many traditional aluminum Moka pots are not directly compatible with induction cooktops. Stainless steel models may be compatible if their bases are induction-ready. You can also use a suitable induction adapter when approved by the manufacturer.
Q
Why does my Moka pot make a gurgling sound?
Gurgling usually happens near the end of the brewing cycle when the remaining water and steam move through the system. A gentle change in sound can signal that the coffee is nearly ready. Remove the pot from the heat when the stream becomes pale or starts sputtering.
Q
Is Moka pot coffee stronger than drip coffee?
Moka pot coffee is usually more concentrated than regular drip coffee. It has a stronger taste and a fuller body because it is brewed with less water relative to the coffee. However, the total caffeine in a serving depends on the amount of coffee used, bean type, and serving size.
Q
Can I leave coffee inside a Moka pot?
It is better to pour the finished coffee into a cup or serving container. Leaving coffee in the hot upper chamber can allow it to continue heating and develop harsh flavors. Empty and clean the pot after it cools.
Q
Is it normal for water to remain in the bottom of a Moka pot?
Yes. A small amount of water normally remains in the lower chamber after brewing. The pot does not need to push every drop through the coffee basket. Avoid continuing to heat the pot just to remove the remaining water.
✦ Wrapping Up
Conclusion
Making coffee with a Moka pot is a simple way to enjoy a rich, concentrated drink at home. You do not need an expensive espresso machine or a complicated setup. A suitable grind, the correct water level, and gentle heat are enough to get started.
Remember the main steps: add water below the safety valve, fill the coffee basket without tamping, assemble the pot securely, and heat it over a low to medium burner. Watch the coffee flow and remove the pot when the stream turns pale or starts to sputter.
If your first cup tastes too bitter, weak, or harsh, do not give up. Adjust the grind, heat, or brewing time one step at a time. With a little practice, you can find a method that suits your preferred coffee strength and flavor.
Finally, take care of your brewer. Clean it after each use, keep the safety valve clear, check the gasket, and dry the parts before storage. These simple habits help keep your Moka pot ready for your next morning cup.
💡 Key Takeaway
For your next brew, start with medium-fine coffee, fill the water chamber just below the safety valve, level the grounds without tamping, and use gentle heat. Remove the pot at the first signs of sputtering, stir the coffee, and enjoy.