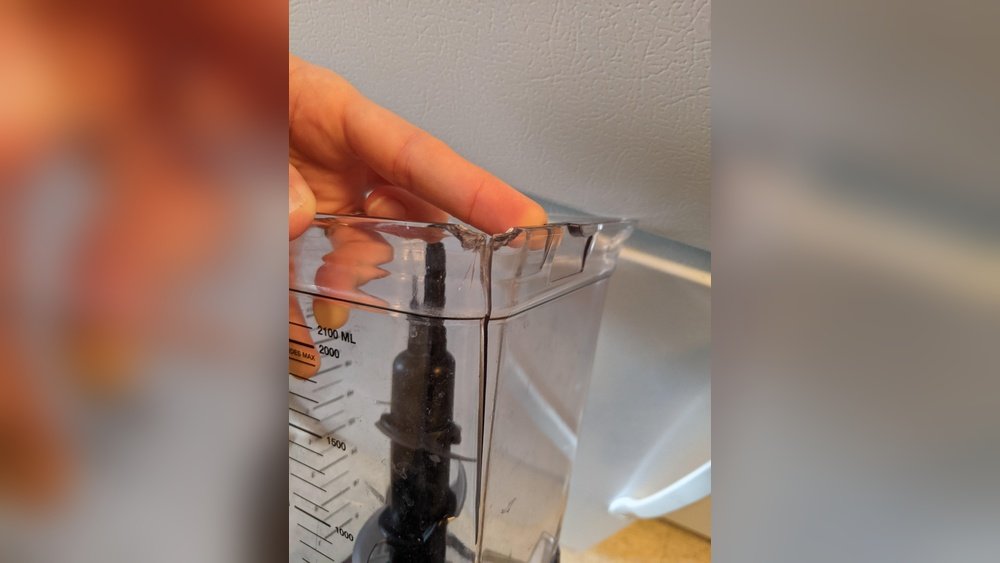
Stop using a cracked blender jar and replace it with a compatible jar. Glue and household sealants cannot provide a reliable repair for a spinning, food-contact container.
In American kitchens, blenders are common tools for making smoothies, sauces, soups, nut butters, and frozen drinks. A damaged blender jar can quickly interrupt meal prep, especially when it starts leaking onto the counter. A small crack may look harmless, but it can become a serious problem once the blades begin to spin.
The safest way to deal with a cracked blender jar is to stop using it, inspect the damage, and find out whether the jar or another removable part needs replacement. Glass jars can break apart, while plastic jars can split, leak, or lose their shape. Neither type should be used for blending once a crack appears.
You may wonder whether superglue, epoxy, silicone, or waterproof tape can save the jar. These products are not reliable fixes for a container exposed to food, vibration, repeated washing, and blade movement. Even an adhesive marketed as food-safe may not be approved for the exact conditions inside a blender.
This guide explains how to handle a damaged jar, identify the likely cause, find a compatible replacement, and prevent another crack. It also covers common leaks that look like jar damage but may come from a worn gasket or loose blade assembly.
You should not repair a cracked blender jar for continued blending. The proper solution is to replace the damaged container with an approved part that fits your appliance. This applies to both glass and plastic blender jars.
A blender jar faces more stress than an ordinary food storage container. The blades spin at high speed, ingredients move around the container, and the motor creates vibration. A crack can spread under these conditions, even if the jar holds water while sitting on the counter.
A glass jar may break and release sharp pieces. A plastic jar may split, leak, or shed small fragments. A damaged base or blade connection can also allow liquid to reach the motor housing.
The important difference is between fixing a removable part and patching a damaged container. You may be able to replace a gasket, lid, collar, or blade assembly when the manufacturer allows it. However, a crack in the actual jar calls for a new jar.
Source: i.ytimg.com
Glass blender jars
Replace a glass jar with any crack, chip, or broken area. Glass can fail suddenly during blending, and a repaired joint cannot be assumed to remain strong under movement and pressure.
Plastic blender jars
Replace a plastic jar with a visible crack, split, or damaged locking area. A patch may peel, weaken, or expose food to an unsuitable repair material.
Leaking blade assembly
If the container is intact, inspect the gasket and blade assembly. A manufacturer-approved replacement seal or assembly may solve the leak without replacing the entire jar.
Why a Small Crack Can Become a Bigger Problem
A crack creates a weak point in the jar wall. Each blending cycle places stress on that area as the ingredients move and the appliance vibrates. The crack may grow over time or open suddenly.
The base of the jar deserves special attention. It supports the blade assembly and connects the container to the blender. Damage in this area can affect the seal, blade alignment, and stability of the jar.
A crack near the handle, rim, or locking tabs also matters. These areas help you lift, close, and secure the container. A damaged connection may cause the jar to sit incorrectly on the motor base.
Do not wait for a leak
A jar does not need to leak before it becomes unsafe. A visible crack is enough reason to stop using it.
Do not test it under power
Never run the blender to see whether the crack spreads. The test itself may cause the damaged jar to fail.
What to Do Immediately When Your Blender Jar Cracks
The first step is to make the appliance safe. If you notice a crack while blending, switch the blender off and disconnect it from the electrical outlet once it is safe to do so. Wait until all moving parts have stopped before touching the jar.
If the jar has broken or is leaking, keep your hands away from the damaged area. Do not pick up loose glass pieces with bare fingers. Use suitable protective gloves and carefully collect the fragments.
If liquid has reached the motor base, leave the appliance unplugged. Do not switch it on to check whether it still works. Liquid inside electrical components needs proper inspection before the blender can be used again.
Source: thekitchenix.com
Turn off the blender
Stop the motor immediately. If the blender has a power switch, use it before disconnecting the plug.
Unplug the appliance
Disconnect it from the outlet before removing the damaged jar or inspecting removable parts.
Wait for the blades
Allow the blades to stop completely. Never try to remove a jar while the motor is still running.
Remove the damaged container carefully
Lift the jar only if it is stable enough to handle. If it is badly shattered, avoid unnecessary movement.
Keep the jar out of use
Set it aside in a safe place so nobody accidentally attaches it to the blender again.
What If the Jar Breaks While Blending?
If the jar breaks during operation, do not reach into the blender or try to save the ingredients. Switch off and unplug the appliance when safe. Keep children and pets away from the counter and surrounding floor.
Wait until everything is still before cleaning up. Wear sturdy protective gloves when collecting broken glass. Inspect the counter, floor, motor base, and nearby surfaces for small fragments.
Do not use food that may contain glass fragments. Even tiny pieces can cause injury. If fragments may have entered the motor base, arrange an inspection rather than restarting the appliance.
Protect your hands
Use suitable gloves and tools to collect broken pieces. Never push glass fragments together with bare fingers.
Check the surrounding area
Look for fragments on the counter, floor, nearby utensils, and appliance surfaces.
Inspect the motor base
If glass or liquid has entered the housing, keep the appliance unplugged and seek qualified service.
How to Inspect a Cracked Blender Jar
A careful visual inspection can help you understand where the damage is and whether other parts may also need attention. Always unplug the blender and remove the jar from the motor base before inspecting it. Keep your fingers away from the blades.
Place the empty jar on a stable surface with good lighting. Look at the entire container, not just the area where you first noticed the problem. Some cracks are easy to miss around the handle, bottom, and blade connection.
Do not press on a suspicious crack, bend the plastic, or scrape the glass to see how deep the damage is. You only need to identify visible damage. Once you find a crack, stop the inspection and arrange a replacement.
Source: masteringmoneytech.com
Inspect the side walls
Look for thin lines, splits, cloudy stress marks, chips, and areas that appear distorted.
Check the bottom
Pay close attention to the area around the blade assembly and the point where the jar meets its collar.
Examine the handle
Look for cracks around the handle attachment points, where lifting and daily use can place stress on the container.
Check the rim
Look for chips and broken edges that may prevent the lid from fitting securely.
Inspect the locking system
Check for broken tabs, damaged threads, or distorted parts that prevent the jar from sitting correctly.
How to Recognize a Hairline Crack
A hairline crack is a very thin split that may be difficult to see in normal kitchen light. It can appear as a narrow line on the side or bottom of the jar. Some plastic containers also develop cloudy stress marks that deserve closer inspection.
Move the empty jar into good light and view the surface from different angles. A bright background can make some lines easier to see. Do not use water pressure or a running blender to confirm the damage.
A mark that is difficult to identify should be assessed with caution. If you cannot tell whether it is a crack, contact the manufacturer and provide clear pictures of the area. Do not use the jar until the issue is resolved.
Look for a continuous line
A line that crosses the jar wall or reaches the bottom may indicate a crack.
Check for small chips
A missing piece of glass is damage even when the rest of the jar looks normal.
Avoid pressure tests
Do not squeeze the container or fill it and run the motor to see whether it leaks.
Can You Use Glue, Epoxy, or Silicone on a Cracked Blender Jar?
No. You should not use ordinary glue, epoxy, silicone, or tape to repair a cracked blender jar that will be used for food preparation. These materials may hold two surfaces together for some purposes, but that does not mean they can withstand the conditions inside a working blender.
A blender jar experiences repeated movement, vibration, food contact, washing, and changes in temperature. A repair that looks solid while the jar is sitting still may fail during blending. A failed patch could allow liquid to escape or release pieces into the food.
Food-contact approval also needs careful attention. A label that says food-safe does not automatically mean a product is suitable for every type of food, temperature, cleaning method, or repeated-use appliance. The FDA evaluates food-contact substances according to their intended uses and conditions.
For these reasons, replacing the damaged jar is the practical solution. Do not rely on a product advertised as waterproof, strong, or heat-resistant as proof that it can safely restore a blender container.
Source: masteringmoneytech.com
Superglue
Ordinary superglue is not a suitable way to restore a cracked food-contact blender jar. It does not provide a verified repair for repeated vibration and blending forces.
Epoxy resin
Some epoxy products have specific food-contact uses, but that does not establish that they are suitable for repairing a blender jar. Do not use epoxy as a substitute for a manufacturer-approved replacement.
Silicone sealant
Silicone may seal certain stationary joints, but a bead of sealant cannot restore the original strength of a cracked jar.
Waterproof tape
Tape can loosen, collect food residue, or fail when exposed to moisture and movement. It is not a safe repair for a blending container.
Hot glue
Hot glue is not designed to restore a blender jar’s structure or provide a reliable food-contact surface during repeated use.
Why Food-Safe Adhesive Is Not Enough
Food-contact safety depends on the intended use of a material. The type of food, temperature, length of contact, and conditions of use can all matter. An adhesive that is suitable for one food packaging application may not be suitable for a blender jar.
The physical strength of the repair is another issue. Even if an adhesive is appropriate for a certain food-contact application, it does not automatically restore the mechanical strength of cracked glass or plastic.
A blender manufacturer designs the jar and its connection points to work as a complete system. Replacing the damaged part with the correct component preserves that intended design better than an improvised patch.
Food contact is only one factor
A suitable material must also meet the requirements of the appliance’s operating conditions.
A strong bond is not a structural guarantee
Adhesive strength does not prove that the original container can safely handle repeated blending.
How to Replace a Cracked Blender Jar
Replacing the damaged jar is the safest way to restore a blender with a cracked container. The key is to find a replacement made for your exact blender model or one that the manufacturer confirms is compatible.
Do not choose a jar only because it looks similar to your old one. Blender containers can have different capacities, blade systems, locking tabs, base shapes, and lid designs. A jar that appears to fit may still fail to connect or operate correctly.
Before ordering anything, find the model number on the blender’s rating label, product packaging, manual, or manufacturer support page. Keep the old jar available for comparison, but do not use it again.
Source: thekitchenix.com
Identify the blender model
Write down the brand and complete model number. Include any letters or numbers that appear after the main model code.
Check the replacement part number
Use the manufacturer’s parts list or customer support service to identify the correct jar.
Compare the capacity
Make sure the replacement has the capacity and measurements approved for your appliance.
Check the blade connection
Confirm that the replacement works with the correct blade assembly, collar, and sealing system.
Confirm the lid fit
Check whether your existing lid fits the replacement or whether a new lid is required.
Step-by-Step Replacement Process
Step 1: Disconnect the blender from the electrical outlet. Remove the damaged jar carefully and place it somewhere it cannot be used by mistake.
Step 2: Find the model number on the motor base or product documentation. If the label is difficult to read, contact the manufacturer’s support team with the product details.
Step 3: Search for an official replacement jar. Check the part number and compatibility information before purchasing. If the original part is discontinued, ask whether the manufacturer approves another container for your model.
Step 4: Compare the replacement with the original. Check the shape, height, locking points, blade connection, handle, and lid. Do not force any component into place.
Step 5: Read the replacement instructions. Some jars arrive with a blade assembly already installed, while others require parts to be transferred according to the manufacturer’s directions.
Step 6: Assemble the new jar as instructed. Make sure the gasket is present and correctly positioned if the design uses a removable seal.
Step 7: Place the empty jar on the motor base and confirm that it locks into position without unusual resistance. The lid should also fit securely.
Step 8: Inspect the assembled unit before use. If anything feels loose, uneven, or incompatible, stop and contact the manufacturer.
Expected result
The replacement jar should sit correctly, lock securely, and match the manufacturer’s instructions without force or improvised parts.
If the jar does not fit
Do not modify the locking tabs or force the container onto the base. Recheck the model and part number.
If the blade assembly is damaged
Follow the manufacturer’s instructions for replacing the complete approved assembly or have the appliance serviced.
Where to Find a Replacement Jar
Start with the blender manufacturer’s official website or customer support service. Many brands list replacement containers, lids, blade assemblies, and seals by model number.
Authorized appliance parts retailers may also carry compatible replacement jars. Compare the exact part number rather than relying on a product title that simply says universal blender jar.
If you are considering a used replacement, inspect it carefully before purchase. Avoid jars with chips, cloudy stress marks, damaged threads, missing locking tabs, or an unknown history of impact.
Manufacturer website
A useful first stop for model-specific replacement parts and compatibility details.
Authorized parts seller
A possible source when the manufacturer directs customers to an approved parts retailer.
Customer service
Contact the brand when your jar is discontinued or the correct replacement part is unclear.
Blender Jar Leaking: Is It Really Cracked?
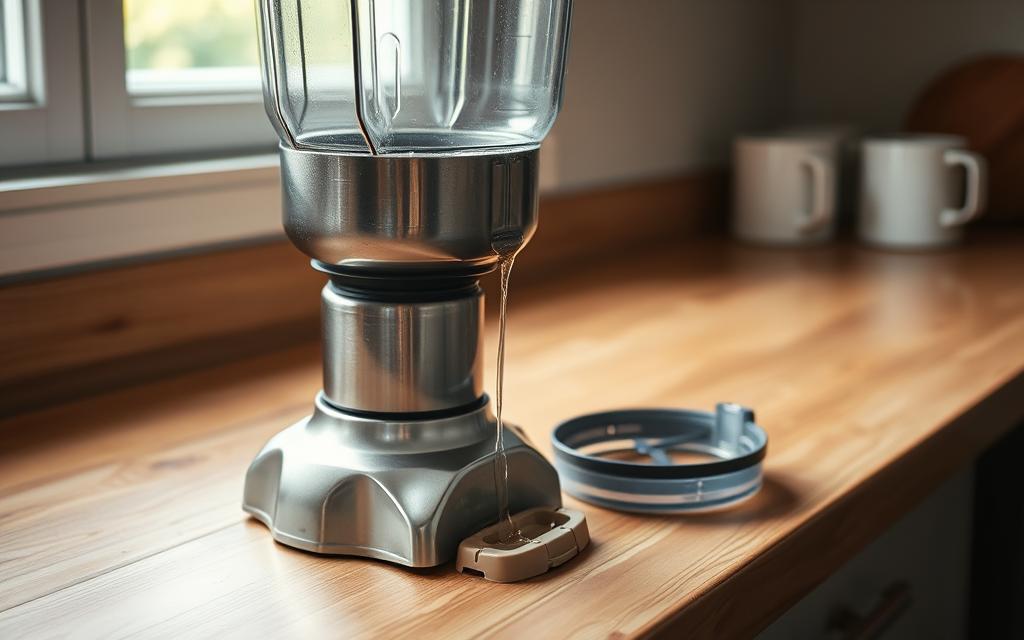
A leaking blender jar does not always have a crack. The leak may come from a damaged gasket, loose blade collar, worn blade seal, or poorly fitted lid. Finding the source helps you avoid replacing a jar that is still in good condition.
Start by unplugging the blender and removing the jar from the motor base. Look for visible damage before considering any other cause. If you find a crack, stop using the container and replace it.
If the jar appears intact, check the removable parts according to the manufacturer’s instructions. Never remove a blade assembly unless your model is designed for that type of maintenance. The blades are sharp, and some assemblies are not meant to be taken apart by the user.
Source: masteringmoneytech.com
Leak around the bottom
Possible causes include a missing gasket, damaged seal, loose collar, or crack near the base.
Leak around the sides
A crack or split in the container wall may allow liquid to escape.
Leak around the lid
An incorrectly fitted lid, damaged lid seal, or overfilled container may allow liquid to spill.
Some blender jars use a rubber gasket between the jar and blade assembly. This ring helps prevent liquid from escaping through the bottom connection.
A gasket may become twisted, worn, cracked, or misplaced after cleaning. If your manufacturer allows users to remove it, inspect the ring for visible damage and confirm that it sits in the correct position.
Replace a damaged gasket with the exact approved part. Do not stretch an unsuitable ring over the blade assembly or use household sealant as a substitute.
Missing gasket
A missing seal can allow liquid to escape from the bottom of the jar.
Twisted gasket
A ring that sits unevenly may fail to seal the connection.
Worn gasket
A seal that has become damaged or deformed may need replacement.
Check the Blade Assembly and Collar
The blade assembly may connect to the jar through a threaded collar or another locking system. If the connection is loose or incorrectly fitted, liquid may escape during use.
Follow the manufacturer’s assembly instructions if the blade unit is removable. Never use pliers or excessive force to tighten the collar. Over-tightening can damage threads, distort a seal, or create stress around the bottom of the jar.
If the blade assembly is cracked, loose, or damaged, keep the blender out of service until the correct part is installed or a qualified service provider checks it.
Inspect the threads
Look for visible damage, cross-threading, or parts that no longer connect evenly.
Check the blade housing
Look for cracks, missing seals, and loose components without touching sharp edges.
Follow the correct assembly method
Use only the tightening and installation method listed in the blender manual.
When Is a Water Leak Check Appropriate?
A simple stationary water check may help identify a leak when the jar has no cracks, chips, or other visible damage and the manufacturer permits this type of check. Keep the jar away from the motor base and do not operate the blades.
Dry the outside of the empty jar and place it on a dry surface. Add a small amount of cool water, then observe whether liquid escapes from the bottom or sides. Stop if you notice a leak.
This check is not a safety test for a cracked container. A jar that holds water while standing still may still fail under blending forces. Never use a stationary test as permission to operate a damaged jar.
Use only an undamaged jar
Do not fill or test a container with a visible crack, chip, or split.
Keep the motor disconnected
Do not run the blender during a stationary leak check.
Stop if liquid escapes
Dry the area and identify the affected removable seal or arrange replacement.
Common Reasons Blender Jars Crack
Blender jars can crack because of impacts, sudden temperature changes, excessive pressure, or normal wear. Finding the likely cause can help you protect the replacement jar.
Glass and plastic respond differently to stress, but neither material is immune to damage. Glass can chip or break after an impact, while plastic may develop stress marks, splits, or distortion.
The exact cause may not always be clear. A jar can have damage that started during an earlier drop or cleaning cycle and only became visible later.
Source: i.ytimg.com
Accidental drops
Dropping a jar on a hard kitchen floor or striking it against a sink can cause cracks or chips.
Sudden temperature changes
Moving a cold jar directly into contact with very hot ingredients can create thermal stress.
Incorrect cleaning
Using an unapproved dishwasher cycle or exposing the jar to unsuitable heat may damage some materials.
Over-tightening
Applying too much force to a removable blade collar can stress the jar or damage its threads.
Incorrect assembly
A poorly seated blade unit or incompatible attachment may place uneven stress on the container.
Age and repeated use
Long-term use, scratches, and repeated stress may contribute to damage over time.
How Temperature Changes Affect a Blender Jar
Glass expands and contracts when its temperature changes. A sudden change can create uneven stress in the material. This is known as thermal shock.
For example, pouring boiling liquid into a very cold glass jar may expose it to a temperature change that the manufacturer does not permit. The same concern applies when a hot jar is suddenly cooled.
Plastic jars can also be affected by heat. Some materials may warp or lose their shape when exposed to temperatures beyond their design limits. Always check the user manual before blending hot ingredients or washing the container in a dishwasher.
Avoid extreme temperature changes
Follow the manufacturer’s temperature limits and allow parts to adjust gradually when the manual requires it.
Check hot-liquid instructions
Not every blender jar is designed for hot soups or boiling liquids.
Follow cleaning guidance
Use only approved dishwasher settings or hand-washing methods.
How to Prevent Your Replacement Blender Jar From Cracking
Good handling and proper cleaning can help extend the life of a replacement blender jar. The most useful habits are simple: avoid impacts, follow temperature limits, assemble parts correctly, and never force the container onto the motor base.
Start by reading the manual for your exact model. Blender jars may look similar, but their materials, cleaning rules, blade systems, and heat limits can differ.
Regular inspections also matter. Check the jar before blending, especially if it has been dropped, exposed to a temperature change, or stored with heavy kitchen items.
Source: thekitchenix.com
Handle the jar carefully
Use the handle when lifting a full jar and avoid hitting it against hard surfaces.
Store it safely
Keep the jar in a stable place where it cannot fall or become trapped under heavy cookware.
Use approved ingredients and settings
Follow the manual’s limits for ice, frozen foods, hot liquids, and other demanding ingredients.
Clean it correctly
Use the recommended soap, sponge, and dishwasher settings for the jar material.
Avoid excessive tightening
Assemble removable collars and blade parts according to the manufacturer’s directions.
Inspect before use
Look for cracks, chips, loose parts, and damaged locking points before each blending session.
Safe Cleaning Habits
Clean the jar after use with the method approved by the manufacturer. Some blender jars are dishwasher-safe, while others require hand washing. Never assume that every glass or plastic jar can go into a dishwasher.
Use a soft sponge or brush to remove food residue. Avoid harsh tools that can scratch the surface. Scratches may make it harder to inspect the jar and can contribute to wear.
Dry the jar before storing it. If your model has removable parts, reinstall them only as directed. Keep sharp blades away from your fingers during cleaning.
Use mild dish soap
A gentle cleaning method is suitable for many jars, provided the manual allows it.
Avoid abrasive pads
Rough scrubbers can scratch some plastic surfaces and damage certain finishes.
Dry before storage
Remove moisture and food residue before putting the jar away.
Use the Correct Blending Method
Do not fill the jar above its marked maximum line. Overfilling can cause spills and put unnecessary stress on the lid and container during operation.
Use the speed settings recommended for your ingredients. Some blenders require lower speeds for certain mixtures or special instructions for crushing ice and processing thick foods.
Avoid using metal utensils inside the jar while the motor is running. If you need to move thick ingredients, switch off and unplug the appliance first, then wait for the blades to stop.
Respect the fill line
Leave the space required by the manufacturer’s instructions.
Use the correct speed
Choose the setting that matches the ingredients and the appliance’s intended use.
Never force thick mixtures
Stop the motor and follow the manual if ingredients become stuck or the blades stop moving.
When Should You Replace the Whole Blender Instead?
Replacing only the jar makes sense when the motor base and other important parts are in good condition. However, there are situations where replacing or professionally servicing the entire blender may be the better decision.
If the motor base has been exposed to liquid, produces smoke, smells burnt, or makes unusual electrical noises, stop using it. These problems need attention beyond a simple jar replacement.
The cost and availability of parts also matter. If the correct jar is no longer available or several major parts are damaged, compare the cost of an approved repair with that of a suitable replacement appliance.
Source: i.ytimg.com
Motor problems
A burning smell, smoke, sparks, or repeated electrical faults require the blender to remain out of use.
Damaged power cord
A frayed or damaged cord needs proper repair or replacement by an appropriate service provider.
Liquid inside the base
Do not restart the appliance after liquid enters the motor housing. Arrange qualified inspection.
Multiple damaged components
A damaged jar, blade system, and motor base may make a full replacement more practical.
Unavailable replacement parts
If the manufacturer cannot confirm a safe compatible jar, do not improvise with an unrelated container.
How to Decide Between Jar Replacement and a New Blender
Start with the condition of the motor base. If it is undamaged and works normally, replacing the jar may be enough. Do not assume the base is safe if the cracked jar leaked into it.
Next, check the cost and availability of the correct replacement parts. Include any required blade assembly, lid, gasket, and shipping costs in your comparison.
Finally, consider the age and condition of the appliance. A new jar may be a sensible repair for a relatively new blender, while a worn appliance with several faults may need broader service or replacement.
Choose a replacement jar
This is reasonable when the motor base is sound, the correct jar is available, and the other parts are in good condition.
Seek professional service
Choose service when the motor base, power system, or internal electrical parts may be damaged.
Consider a new appliance
Compare the full repair cost with the cost of a suitable replacement when several parts are worn or unavailable.
Common Mistakes to Avoid When Dealing With a Cracked Blender Jar
A damaged blender jar can tempt you to try a quick fix, especially when you need the appliance for daily meals. However, some shortcuts create more risk than they save.
The best approach is to separate safe maintenance from structural repair. You can inspect removable parts, check model information, and order a replacement. You should not try to restore a cracked container with household materials.
Source: masteringmoneytech.com
Continuing to blend with a small crack
A small crack is still structural damage. Do not wait for the jar to start leaking or breaking apart.
Using glue as a permanent repair
A glued area does not restore the original strength or prove that the material is suitable for food contact.
Buying a jar based only on appearance
Similar-looking containers may have different locking systems, blade connections, and capacities.
Forcing the jar onto the base
A replacement should fit as designed. Forcing it can damage the locking system or create an unstable connection.
Ignoring the blade assembly
A damaged blade unit or seal can cause leaks even when the replacement container is intact.
Testing a cracked jar with water
A stationary water test cannot establish whether a damaged jar can withstand the force of blending.
Ignoring liquid around the motor
Liquid inside the electrical base can create a separate safety problem that needs proper inspection.
A Better Way to Handle the Repair
Think of the blender jar as part of the appliance’s working system, not just a bowl that holds ingredients. Its walls, base, blade connection, and locking points all have a role in safe operation.
If the container is damaged, remove it from service. If the leak comes from a replaceable seal, follow the manufacturer’s repair instructions. If the motor base is affected, arrange service before using the appliance again.
This approach may take a little longer than applying glue or tape, but it avoids relying on an unverified repair.
Identify the damaged part
Determine whether the problem is in the jar, gasket, collar, lid, blade assembly, or motor base.
Use approved components
Choose replacement parts confirmed for your exact blender model.
Check before restarting
Make sure all parts are installed correctly and that the appliance has no unresolved electrical or mechanical damage.
Frequently Asked Questions
Q
Can I use a blender with a small crack in the jar?
No. You should not use a blender with a cracked jar, even if the damage looks small. The crack can spread when the blades spin and the container vibrates.
A glass jar may break, while a plastic jar may split or leak. Stop using the container and replace it with a compatible part.
Q
Can superglue fix a cracked blender jar?
Superglue is not a suitable repair for a blender jar used for food preparation. A glued area may fail under vibration, repeated washing, and temperature changes.
It also does not prove that the repaired surface is suitable for repeated food contact. Replace the damaged jar instead.
Q
Can I use epoxy to repair a cracked glass blender jar?
You should not rely on epoxy to repair a cracked glass blender jar. Even products with specific food-contact approvals may not be suitable for the heat, movement, cleaning, and mechanical stress involved in blending.
An adhesive cannot be assumed to restore the original strength of the glass. A manufacturer-approved replacement jar is the safer option.
Q
How do I know whether my blender jar is leaking because of a crack or a bad gasket?
Look for visible damage around the container walls, bottom, and blade connection. A wet line along the jar wall may point to a crack, while a leak around the blade assembly may involve a gasket or seal.
Only inspect an unplugged appliance. If the jar is visibly cracked, replace it without testing. If the container is intact, follow the manufacturer’s instructions for checking removable seals and blade parts.
Q
Can I replace only the glass blender jar?
Yes, if the manufacturer offers a compatible replacement and the motor base and other components are in good condition. Check the model number, jar capacity, blade connection, and locking system before ordering.
Do not assume that a glass jar from another brand or model will fit your appliance. Use a replacement confirmed by the manufacturer.
Q
Can a cracked plastic blender jar be repaired?
A cracked plastic blender jar should also be replaced. Plastic may look easier to patch than glass, but a repaired container can still fail during blending.
Glue, tape, and sealants do not restore the original design strength. Choose an approved replacement container instead.
Q
Why did my blender jar crack even though I did not drop it?
A jar can develop damage without a noticeable drop. Sudden temperature changes, repeated stress, unsuitable cleaning methods, over-tightening, and normal wear may contribute to cracks.
The exact cause may be difficult to identify. Check the manufacturer’s cleaning and temperature instructions, and inspect the replacement jar regularly.
Q
Can I put a cracked blender jar in the dishwasher?
Do not put a cracked blender jar in the dishwasher for continued use. It should be removed from service and replaced.
For an undamaged replacement jar, follow the manufacturer’s cleaning instructions. Some jars are dishwasher-safe, while others require hand washing.
Q
Is a leaking blender jar always cracked?
No. A leak may come from a worn gasket, missing seal, loose blade collar, damaged blade housing, or poorly fitted lid.
Inspect the jar for visible damage first. If it is intact, check only the removable parts that your manufacturer allows you to inspect. Replace damaged seals or assemblies with approved parts.
Q
How much does it cost to replace a blender jar?
The cost depends on the blender brand, model, jar material, capacity, and whether the blade assembly or lid is included. Replacement parts can vary widely in price, so there is no single reliable amount for every blender.
Check the manufacturer’s parts catalog and compare the complete cost with that of a suitable new appliance. Confirm compatibility before making a purchase.
✦ Wrapping Up
Conclusion
A cracked blender jar is not a good candidate for a DIY glue or sealant repair. Even a small crack can grow during blending and lead to leaks, broken glass, or damaged plastic. The safest response is to switch off the appliance, unplug it, and stop using the damaged container.
Start by checking where the damage is located. If the jar itself is cracked, replace it with a manufacturer-approved part that matches your blender model. If the container is intact and the leak comes from a removable gasket or blade assembly, follow the manufacturer’s instructions for replacing that part.
Before using the blender again, make sure the replacement fits securely and that the blade assembly, lid, and locking parts are in good condition. Also check the motor base for signs of liquid damage. If anything seems wrong, arrange proper service rather than testing the appliance.
With careful handling, suitable cleaning, and regular inspections, you can help prevent future damage and keep your blender ready for everyday kitchen tasks.
💡 Key Takeaway
Unplug your blender, stop using the cracked jar, identify your exact model number, and order a manufacturer-approved replacement. Never rely on glue, epoxy, silicone, or tape to restore a damaged blending container.